Here is how to create a simple PHP script to send a water meter and other metrics in to Home assistant. You will need the MQTT addon for this to work. Code for configuration.yml PHP Code to push a meter reading in to Home Assistant. You will need the package phpMQTT from git hub https://github.com/bluerhinos/phpMQTT…
Automating your home with Home Assistant. Initial install and config (Hyper-V).
Installation and initial set up Download the Hyper-V image from https://www.home-assistant.io/installation/windows/ Load the appliance image into your virtual machine hypervisor. Minimum recommended assignments: After creation go to “Settings” -> “Security” and deselect “Enable Secure Boot”. Adding Home Assistant Community addons profile > enable advanced Settings > Addons > “Terminal & SSH” Open terminal and run…
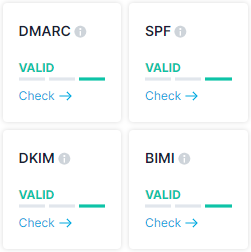
The importance of setting up email security correctly.
Below is why having properly configured email SPF, DMARC, DKIM Records is so important. I have my domain set up with all the relevant DNS entries. This means that the receiving person can be sure that the email came from me. The below is a DMRC report you get when emails are received by servers…
Automate Debian installations with Seed, DHCP and Nginx.
In this post i will detail how to automate the installation of Debian through the use of a Seed File and DHCP. If like me you install a few Debian Servers for things like web servers and stuff. you will have had to sit through the installation, clicking options. Well now you don’t have to….
A simple link shortener.. Fun little project…
We have all seen and used those URL shorting sites. It takes a very long link and converts it to a short link for emailing. When you click the short link it takes you to the link website address. Below I thought I would make my own. Feel free to use the below to make…

A Simple Load Balancer. Also Monitors Node Stats.
Below i document how to make a simple Load Balancer. This load balancer uses HAProxy and monitors the health of a server using a script. If the health of the server goes down, HAProxy Removes the Node from the “Cluster”. Below is the HAProxy Config. Below is the PHP Script running on the servers to…

I just wanted to control dumb storage heaters… But…..
So my story beings like so many people in this country with storage heaters. Dumb storage heaters that have no real control. You either turn them on or charge them during the night and let the heat out during the day. This was not what I wanted. I wanted more control over the temperature in…
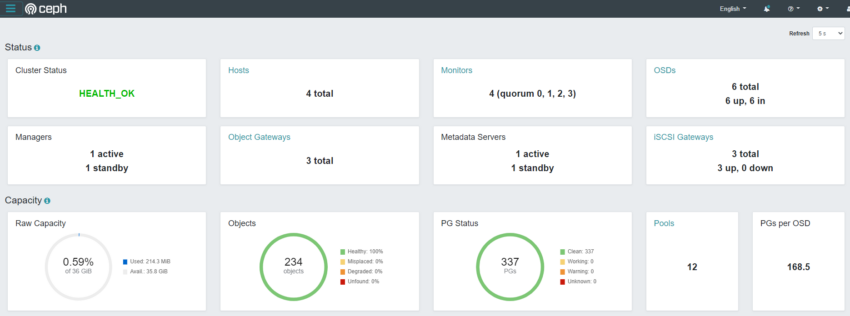
Installing a CePH Cluster (quincy)
In this post i detail how to get a CePH quincy Cluster up and running. This is my standard goto script for setting up any CePH Cluster and then tweak it once set up. Set hostname for all nodes Update hosts file with all servers in the cluster Inital Software Install CephADM Create local SSH…

Install Observium and PHP WeatherMaps on Debian 11.
Observium Installation You may need to install wget on bare installations Grab Observium installation script and run it. WeatherMap installation and configuration log on to gui “http://[IP_Address]/weathermap/editor.php” and make a new weather map “network.conf” click on “map properties. In “Output Image Filename” > “network.png”. In “Output HTML Filename” > “maps/network.html”. Once you have created a…

Simple Hosted Website, Email and Application…
Below is an illustration on how to create a simple hosted website with email access on a budget. This is reasonably secure too using cloudflare to proxy everything. Combined with OVH, this is a powerful little set up.